Monthly Archives: May 2013

Using Magic Garageband!

magicgaragebandrv8

Feel The Magic!

Feel The Magic

The latest version of GarageBand –  ’11, makes coming up with a song without ever laying hands an instrument  easy – with Magic GarageBand.  This will guide you through the process to make an awesome track for YouTube videos, ringtones, or own music.

Here’s how!

First off, open GarageBand ’11 and select the Magic GarageBand icon in the left panel. There are nine icons to the right, each representing a musical genre.

To listen to a track, hover over the icon you want to hear and click the Preview button that shows up.

Once you’ve chosen your favourite musical genre, click the chosen icon and head to the stage. GarageBand will show all the instruments that have been chosen for that particular song.

&nbsp

Once it’s all loaded, hit the play at the bottom of the screen to preview the entire song. First, you’ll see that the front most instrument is supposed to be the instrument that you are playing, like a guitar or piano.

If you’re not playing an instrument, click it and select the ‘No Instrument button’ at the bottom of the panel, to make it magically disappear.

Now, hover over the other instruments on the Garageband stage, and a spotlight will come on, as well as the the name of the instrument.

Select an instrument and other options for that particular track will show up at the bottom of the window.

For example, select the drums and all the other available drum kit types will be shown. Click on one of them while the track is playing back and you’ll hear the difference it makes to the overall mix.

It may take a few moments for the new instrument to to drop into your mix, so hold your horses until it happens.

Once you’ve chosen which instruments you want to hear, it’s time to Open in GarageBand.

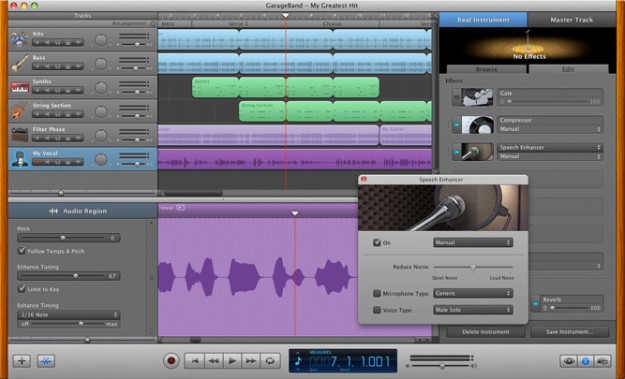
Click the button that says this, and the full Garageband interface will be shown. Now, you can change the panning, volume, effects and anything else you would usually do in your Garageband projects.

You can drag the track sections around at the top of the panel, as well, by clicking the title bar (Verse, Bridge, Ending, et al.) andmoving it to where you want it to go.

You just created a song in under ten minutes! AMAZING!

Press Share in the toolbar and choose how you want to send your magnum opus out to the world. Choose a sharing options to get the song from the editing stage to the final stage, whether you want to make a ringtone for your iPhone or burn the song to a CD.


Want to learn How To Use Garageband?

Make Your Own Loops!!!

apple_garageband09

Make Your Own Loops!!!

GarageBand for Mac OS X is a complete recording program for your Mac. It lets musicians connect microphones, guitars, keyboards, and many other instruments for a completely analog recording session. It has MIDI playback as well as MIDI recording abilities as well, allowing just about anyone who has a MIDI capable keyboard to record alongside others who have instruments instruments.

One of the less talked about features,though, is the Loops section. GarageBand comes packaged with lots of pre-recorded MIDI and sampled audio snippets that can be put together in a myriad of different ways.

Without knowing how to play an instrument, anyone can come up with fantastic sounding music with GarageBand, by simply using the pre-packaged Loops.

Sound good?

First off –  bring up the GarageBand Loops browser. Open GarageBand and select a New Project.

If you already have GarageBand open and are in a project, select New Project from the File menu in the toolbar to get to this window.

Select Loops, and then click the Choose button in the right lower corner. You’ll have a chance to name your file (something memorable will help), and put it somewhere where you will be able to easily find it again. (like your desktop)

The familiar GarageBand window will open. This time, the Loop browser will show up in the right hand pane however. Notice the various filter buttons that top this browser pane.

Select a musical style, like Rock/Blues, Jazz, or Classical from the left column, or click the type of instrumentation you prefer in the column on  the right, filtering your list to show only the Loops containing particular instruments, like strings, Piano, Synths, harps, etc.

The two columns to the right are filters for tone and mood, filtering for loops Apple has categorized as Relaxed, Grooving, Melodic, Dissonant, etc.

Click the buttons to filter the list of available GarageBand Loops to your liking. For  example, click on Electronic in the filter list. If you happen to see the Column browser, or the Jingles, Stingers, or Sound Effects browser, click on the little musical notation item in the tab buttons that are at the upper left of the Loops pane.

Select Beats in the second column, and click any of the beats to get a taste of them. Once you’ve chosen one you like, click and drag the Beat’s name to the Track window. A new track will magically appear, and a big green Plus button will pop up. Make sure to drag your loop over to the far left, this way it will start on the first measure.

Drop the beat there. Hover the mouse over the right hand corner of the resulting green rectangle and you’ll bring up the extend cursor; it looks just like a round arrow. Drag the corner, and GarageBand will automatically extend the Loop, with a visual cue as to the beginning and end of each  section.

Next step, in the Filter list, Select Beats to reset the buttons. Click on Synths, rinse and repeat the above process. Mix and match loops as much as you want, making sure to create a new track for each new sound. This’ll help the editing process later.

Once you find a synth track you like, filter to Bass loops, and bring a nice grooving bassline over.

To hear your masterpiece put together, hit the Play triangle at the bottom. You’re also able to set the Cycle/Loop button so GarageBand only plays the section you’ve selected, over and over. That helps get into the groove of your project.

Give it a shot!

Want more Garageband greatness? Check out The Garageband Guide!